Testing with QUnit: Part 1
Recently I was asked on Twitter to do a tutorial on QUnit, a JavaScript Unit Testing framework, and the one used by jQuery. What I wanted to do however, is use it with a real project, rather than set up some fake project. So, I've done just that. Having worked with the Instagr.am API recently, I'm going to use this series of tutorials to write a JavaScript wrapper for the Instagram API & test it with QUnit. Unlike most content on this site, this is going to be a multi-part tutorial, but I hope to still manage to achieve 1-2 specific things within each post. If you've any questions, please leave a comment & I will answer all questions at the beginning of the next tutorial. I'll presume you're vaguely familiar with the idea of Unit Testing in general. At the end of the series you should have a working knowledge of QUnit and how to use it. I'll also open source the Instagram Wrapper we create onto Github. As this series is mainly focusing on testing, I wont highlight how I do everything in terms of querying the Instagram API but I will point out specific bits that I think are useful.
What we will achieve today
- Set up a QUnit testing suite
- Write our first QUnit tests
- Query the Instagram API to get information on a specific Instagram Image
- Learn how to test Async calls in QUnit
The first step is to set up our directory. I like to set mine up like so:
/app instagramwrapper.js /test instagramwrapper_tests.js /qunitsrc tests.html
The first thing we need to do is include all the QUnit source. QUnit needs 3 things:
- We need to include the QUnit JS Source
- We can link to the QUnit stylesheet to make the output look good
- It needs a specific HTML structure.
You can find download links for the JS & CSS files here. You could include them direct but I like to download them & add them locally, putting them into the qunitsrc directory.
<link rel="stylesheet" href="qunitsrc/qunit.css" type="text/css" media="screen">
<script type="text/javascript" src="qunitsrc/qunit.js"></script>
<script type="text/javascript" src="app/instagramwrapper.js"></script>
<script type="text/javascript" src="test/instagramwrapper_tests.js"></script>
And the HTML structure we need:
<h1 id="qunit-header">QUnit Test Suite</h1>
<h2 id="qunit-banner"></h2>
<div id="qunit-testrunner-toolbar"></div>
<h2 id="qunit-userAgent"></h2>
<ol id="qunit-tests"></ol>
Most of those are fairly explanatory. If not, don't worry, once we run an actual test it should become more apparent. Before we write our actual code, lets set up a test test just to make sure it works. Load up instagramwrapper_tests.js (I'll refer to this as just "the tests file" from now on) and put in:
function saysHi(name) { return "Hi, " + name; };
test('saysHi()', function() { equal(sayHi("Jack"), "Hi, Jack", "function outputs string correctly")
});
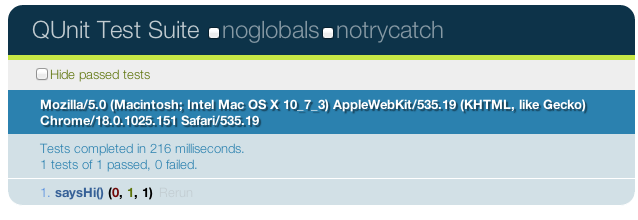
You can see I define a simple function and then run tests on it, expecting sayHi("Jack") to equal "Hi, Jack". If you run it however, we get a failure:
saysHi() (1, 0, 1) Died on test #1: sayHi is not defined Source: at Object.
Why's that? Well, turns out in the equal() call I referenced sayHi, but it's actually saysHi.
Run it again, and it passes!
Now, for our first real test, lets take a look at the Instagram API. Say I have an Instagram URL, such as http://instagr.am/p/JYAdvJr0K9/ (which happened to be the first URL I found in my Twitter feed). And I want to get the exact URL to it. When we're testing, we first write tests, see them fail, and then make them pass. Before we dive in, I'll just do a little set up in the main implementation file:
(function() { var instagramwrapper = { oembed: { web_url: "", } }; window.instagramwrapper = instagramwrapper; })();
The reason for the oembed namespace is that the bit of the API we'll be using is named as such. So, time to write some tests. I'll write a couple just to check we've set things up correctly, and then we can get into specific tests for this bit. Here's my initial tests:
test('Set Up Tests', function() { ok(instagramwrapper, "instagram wrapper is exists and is not undefined"); });
test('oembed', function() { ok(instagramwrapper.oembed, "oembed namespace exists"); instagramwrapper.oembed.web_url = "http://instagr.am/p/JYAdvJr0K9/"; equal(instagramwrapper.oembed.web_url, "http://instagr.am/p/JYAdvJr0K9/", "Can set the web_url correctly"); });
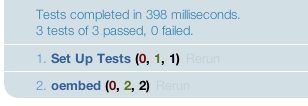
All these tests pass, but one thing was irritating me, and that is that by default QUnit doesn't show all the tests, but just the heading:
I wanted to change this, so I delved into the QUnit JS source and on line 192 I found:
if (bad === 0) { ol.style.display = "none"; }
I simply commented out that middle line and now it shows the full details:
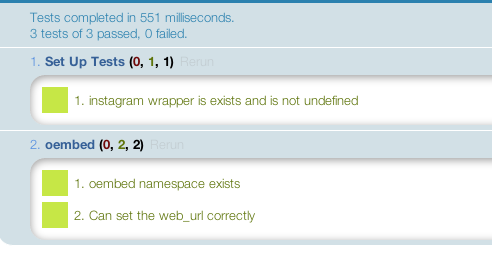
Obviously this is more a personal preference, so if you want to do it, feel free, but if not, that's fine too.
Now I want to write some code to get the media URL that is returned from this API end point: http://api.instagram.com/oembed?url=http://instagr.am/p/BUG/. I could write the Ajax call in a get_url() function but as this query returns a set of data, I'll write a function to take a callback that has the data passed into it, and let the user then grab what they need. I'll also be using jQuery here for the Ajax calls. We could do them in cross browser JS, but that's a huge pain & beyond the scope of this tutorial.
Normally at this stage I'd say to write the test, but we have a problem. How do we test asynchronously?
The obvious answer is to make the Ajax test non-async, but that's not a good solution. Thankfully, QUnit helps us out here with its asyncTest() method.
QUnit has stop() and start() methods which tell the framework to stop its tests, so it can wait for a Ajax call to run and then start the requests again. The asyncTest() method just does the stop() bit for us. So most asynchronous tests look a bit like:
asyncTest("some Ajax call", function() { someAjaxCall(function(resp) { //callback start(); //tell QUnit to run tests again }); });
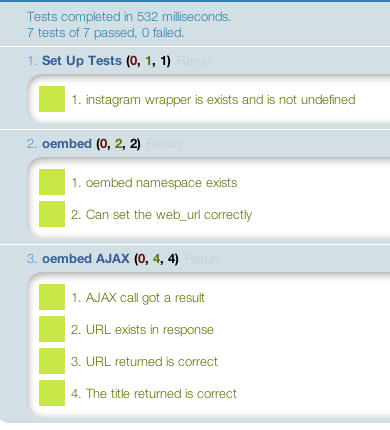
And inside the callback, before you call start(), is where you run your assertions that rely on the Ajax result. I've written some tests within the callback that should validate everything works correctly. I then call start() to tell QUnit it can run the rest of its tests again.
test('oembed', function() { ok(instagramwrapper.oembed, "oembed namespace exists"); instagramwrapper.oembed.web_url = "http://instagr.am/p/JYAdvJr0K9/"; equal(instagramwrapper.oembed.web_url, "http://instagr.am/p/JYAdvJr0K9/", "Can set the web_url correctly"); }); asyncTest("oembed AJAX", function() { instagramwrapper.oembed.web_url = "http://instagr.am/p/JYAdvJr0K9/"; instagramwrapper.oembed.query(function(res) { ok(res, "AJAX call got a result"); ok(res.url, "URL exists in response"); equal(res.url, "http://distilleryimage5.instagram.com/9436051c85b011e18cf91231380fd29b_7.jpg", "URL returned is correct"); equal(res.title, "Drainpipe", "The title returned is correct"); start(); }); });
Running these tests (without any implementation, rememeber!) will give you some errors. Now we take the next TDD step. Fix those errors, one at a time. The first will complain about query() being undefined, so add the function, refresh & continue on. You'll hit a bit of a problem here. The tests will just run forever, as that start() never gets called. This is because the function query() exists, but it does nothing. So QUnit doesn't get an error that query() is undefined, so it calls it but then never gets that start() call again. What we can do to prevent this issue is to add a setTimeout after my assertions that will run after 1000 milliseconds, telling QUnit to continue anyway:
setTimeout(function() { start(); }, 1000);
That gives us the error:
Expected at least one assertion, but none were run - call expect(0) to accept zero assertions.
Another feature is that we can tell QUnit how many assertions we expect, so it knows when that doesn't happen & can tell us. In our case, we expect 4. Two calls to ok(), and two to equal(). We pass this in as the second parameter to asyncTest():
asyncTest("oembed AJAX", 4, function() {
At this point QUnit gives us the error:
Expected 4 assertions, but 0 were run
I'm not going to show you how to solve all these issues as most are straight forward from here on in, it's a simple Ajax call. Here's my implementation:
query: function(cb) { var ajxreq = $.Ajax({ url: "http://api.instagram.com/oembed?url=" + this.web_url, dataType: 'jsonp' }); ajxreq.success(function(resp) { cb(resp); }); }
The code works by taking a callback, that it will automatically pass our data into. Run the tests, and I'm greeted with all greens, lovely!
That brings us to the end of the first tutorial. In this we've achieved a great deal, learning how QUnit works, how to run async tests in QUnit and working with the Instagram API too. Not bad at all! Next time we will continue writing & testing, but at a bit more of a faster pace, now you've got the hang of QUnit. You can get all the code from the Github Repo. Each tutorial is on its own branch, for this one you want the branch tutorial1. The master branch will contain the current up to date code, whereas the tutorial branches will only contain the code from each tutorial and no more. Any questions, please leave a comment and I will answer them in part 2.