Node & Express Todo App: Redis
Today I'll pick off where Part 1 left off, and start working on the to-do part of our application. This tutorial literally starts where Part 1 stops, so if you haven't read Part 1 or need a refresher, I highly recommend reading that before this.
Note: this tutorial uses Express 2.5.8. Currently Express V3 is in beta. Once Express 3 stable is released, I will run a post discussing updating to it and link to it here. In the mean time, if you're using Express 3, a few things might be different to this tutorial. None-the-less, there's still a lot here that you can learn from, I hope.
The first thing I'm going to do is create a new view for our Todo screen. This will list our todos and also provide a form for adding new ones. Create the file views/todo.jade and add something like this:
h1 new todo list form(action="/save", method="post") p label Enter a new todo item input(type='text',placeholder='new todo', name='todo-text') p input(type='submit', value='Save')
And then we need to add the route for this, so the user sees this view when they go to /todo.
Head into route/routes.js:
exports.todo = function(req, res){ res.render('todo', { title: 'New Todo List' }); };
And finally we just need to link this route up to our URL, which is done at the bottom of app.js (which you may have renamed to server.js, as per the previous tutorial):
app.get('/todo', routes.todo);
If you're not already, run our server with nodemon app.js. If you haven't got nodemon installed, please see the previous tutorial.
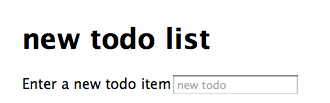
Now, if you visit http://localhost:3000/todo, you should see something like this:
Lets build in the functionality for listing some todo items. Obviously at the minute we don't have any of them, so I'll add some fake ones in. When you render a view, you can pass in variables, as we did above to set title. Lets pass in an array of objects into the view to represent our items. For now they will be pretty simple:
h1 new todo list form(action="/save", method="post") p label Enter a new todo item input(type='text',placeholder='new todo', name='todo-text') p input(type='submit', value='Save') ul each todo in todos li #{todo.text}
Now we can make use of Jade's built in looping mechanism to loop through our array. It's really beautifully simple:
ul each todo in todos li #{todo.text}
All I do here is create a new unordered list, and for each item within the todos array (which I passed in above), just output the text.
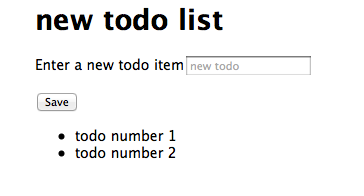
And now our view looks like so:
It's now time to actually implement the adding of new todos.
The first question is how to store our items? I'm going to use Redis. There's good documentation out there on how to install it, so I wont go through that here. One thing I will mention is if you're on Mac & use Homebrew, by far and away the easiest install is through this, using brew install redis.
Then we need the NPM Package for Redis, which you can install locally with:
npm install redis --save
Remember, doing --save will add it as a dependency to your package.json file.
Now, within the file where we're going to be using Redis, which for us will be exclusively routes/routes.js. You might be thinking it seems a bit messy to put it in here - and you'd be right. In a future tutorial I will show you how I'd tidy this up, but for now I want to concentrate purely on the Redis functionality.
So, within your routes file, add in this code:
var redis = require("redis"), client = redis.createClient();
You'll also need to make sure a Redis instance is running on your machine. Try typing redis-cli in the command line to see if it's running. On the Mac, to run the server you can type:
redis-server /usr/local/etc/redis.conf
Redis is a key-value datastore that's lightening quick & perfect for our needs here. Redis can be used with lots of datatypes but the most common use is a hash, where we store objects.
Firstly, lets link up our form. Add this line to app.js:
app.post('/save', routes.saveTodo);
And add the function to handle this route (don't panic, I'll explain the code in a second):
exports.saveTodo = function(req, res) { var newTodo = {}; newTodo.name = req.body['todo-text']; newTodo.id = newTodo.name.replace(" ", "-"); client.hset("Todo", newTodo.id, newTodo.name); res.redirect("back"); };
All I do here is create a new object to store our new todo. I can get at the post data through req.body['todo-text'] - remember I gave our form field a name of that. Each item that is stored in Redis needs an id attached to it, which has to be unique. A simple way to do this in this instance is to generate the ID based on the name, but replacing spaces with "-", which is what I do to generate the ID using replace(" ", "-").
Finally, once I have my new Todo object, I use the hset method (because we're storing a hash, hence the "h"), passing in a key which acts as the name of the datastore, and then I pass in the id & name as new parameters.
Once that's done, I want to pass the user back to the main todo page, so I can redirect the user back to where they came from, which would have been the main todo page.
Once that's done, we need to edit exports.todo to get the todo items from the data store. To get data from Redis, I can use hgetall (again, the "h" denoting hash). This takes two arguments, the key (which for us is "Todo") and a function to process the data. All I do here is loop through & store the new items into an array.
exports.todo = function(req, res){ var todos = []; client.hgetall("Todo", function(err, objs) { for(var k in objs) { var newTodo = { text: objs[k] }; todos.push(newTodo); } res.render('todo', { title: 'New Todo List', todos: todos }); }); };
The key thing to note here is that the call to res.render is now inside the hgetall function. This is down to the asynchronous nature of Redis, you need to call the render only once you know you've got your data. It's much the same as when you're working with data fetched from an Ajax call. Once we do have our todos array, I can pass that into the view.
Now I can go in and add something, and then I'm immediately taken back to the same page, with that item added.
In summary, we've covered a lot today, the main focus being using Redis but we've also explored Jade further & done more with Express.
As always, if you have any questions please leave a comment & the code from this tutorial is available on Github.
In the coming parts I'd like to look at tidying up this code - perhaps abstracing all the Todo functionality out into an individual file - and then look at testing that file.